Letter Avatars with Serverless


Introduction
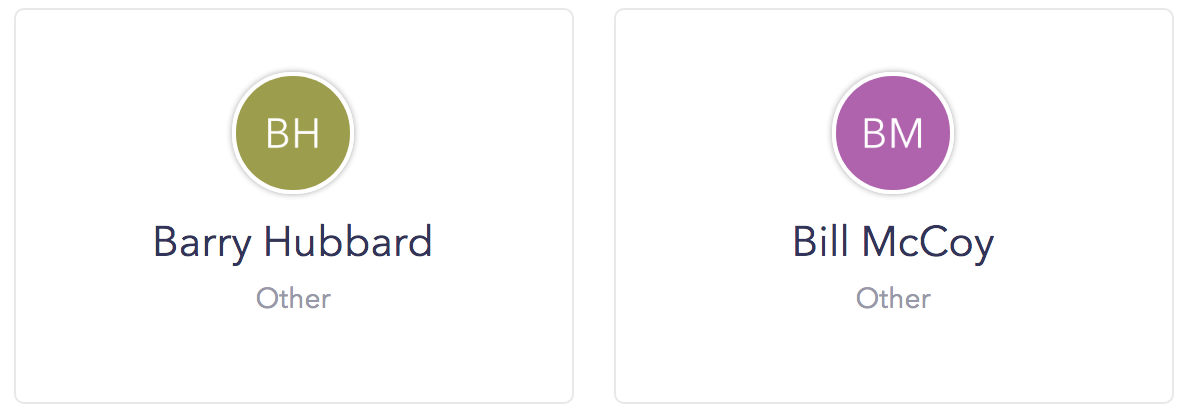
Unfortunately not all users upload avatar photos. Companies like Apple and Google use default avatars with the user’s initials as a way to uniquely represent a user. In order to provide a colorful and useful experience for our users, we wanted to generate avatar images based on our user’s initials. This will provide a colorful and professional experience instead our previous randomized generic profile images of cats.
Serverless technologies are awesome for kicking up microservices rather than bloating out your existing application. Avatar initial libraries can be added to your monolithic backend system that already delivers HTML and JSON content, but we do not need to bloat our project further with image generation. If you have a directory view, then your application server will be heavily taxed with profile image generation. With serverless, profile image generation will automatically scale as your users grow. API users shouldn’t be fighting avatar image requests for workers on your monolythic app.
This describes on to make a microservice for delivering avatar images using the serverless framework with nodejs.
Source
If you want to jump ahead to deploy, the source code for this blog post is here. readme.md has information on how to configure AWS Lambda.
Prerequisites
These need to be setup and configured on your machine:
Use the respective links to learn how to configure these services. GraphicsMagick is used to generate the png files for display.
Step 1: Create a new serverless project
Setup a new serverless project for AWS lambda. This will copy the standard aws-nodejs template that already has basic http configurations
# Create a new Serverless project for letter-avatar
$ serverless create --template aws-nodejs --path letter-avatar

# Change into the newly created directory
$ cd letter-avatar

# create the package.js file
$ npm init
This gives us the basic AWS template that returns a string of data to the caller. We will be using their binary format in their API gateway to deliver PNGs. The api-gateway will be expecting a base64 encoded string + the appropriate content-type header to trigger our lambda function.
Step 2. Add dependencies
We will use the npm gm package to actually generate our images and we will need gm-64bit to output the 64 bit version of our pngs so that AWS Lambda can spits those out.
$ npm install gm gm-base64 -s
The -s flag will add these changes to our package.js.
Step 3. Write the initials code
There are 3 main sections of this code: Background color, image size, and actually generating the image. All of the js will go into handler.js. Before we get into the interesting part of the code, lets change the handler function name from hello to endpoint
module.exports.endpoint
So it makes a little bit more sense.
Step 3a. Background color
We want to have an assortment of background colors so that everything wont look the same, but we also don’t want to randomly assign a background color to an image, or every time they refresh the page the user will be changing colors.
  var choices = ['#F44336', '#E91E63', '#9C27B0', '#673AB7', '#3F51B5',
    '#2196F3', '#03A9F4', '#00BCD4', '#009688', '#4CAF50', '#8BC34A',
    '#CDDC39', '#FFEB3B', '#FFC107', '#FF9800', '#FF5722'];

  var initials_sum = initials.charCodeAt(0) + initials.charCodeAt(1);
  var color_index = initials_sum % choices.length;
  var background_color =  choices[color_index];
The colors are from Google’s Material Design
We solve this problem by summing the bytes of the initials and selecting a color based on that. Since the initials never change for a given set of initials, each initial paring will have the same colors each time it is requested.
Step 3b. Image size
Depending on where these images are used, we will need to be able to generate different sizes. For emails or mobile, we may want to deliver a smaller image than for desktop web.
var size = 256
var params = event.queryStringParameters
if (params) {
  size = params.size ? parseInt(params.size) : size
}
A default value is set to 256, so we don’t always need to put a size attribute.
So now that we pulled out the size attribute, we also need to find out the font_size and top_offset for the text. We will need to adjust the font size and location of the initials based on the size of the avatar we are rendering.
var font_size = Math.floor(size / 256 * 95)
var top_offset = Math.floor(size / 256 * 10)
95 and 10 are just magic numbers I found to be a good fit for the font I chose. If you change out the font, you will need to change these values.
Step 3c. Image generation
Here is where we use imageMagick to generate the images. We center the text, turn it white, draw the text with the fontsizes and offset calculated previously.
require('gm-base64');
var gm = require('gm').subClass({ imageMagick: true });

gm(size, size, background_color)
  .gravity('Center')
  .fill('white')
  .font('fonts/AvenirNext.otf', font_size)
  .drawText(0, top_offset, initials.substring(0,2).toUpperCase())
  .toBase64('png', function(err, base64) {
  const response = {
    statusCode: 200,
    isBase64Encoded: true,
    headers: { "Content-Type" : "image/png" },
    body: base64 };
  callback(null, response);
});
The Content-Type needs to be image/png for browsers to understand the type of payload.
isBase64Encoded is tells AWS Lambda that the body is base64 encoded so it can properly deliver the binary payload.
For the latest source code
Step 3d. Serverless configuration
Our serverless app needs to know how to configure the api-gateway to call our lambda function.
In serverless.yml, we can configure it to be triggered on an http event with the given url.
service: letter-avatar

provider:
  name: aws
  runtime: nodejs6.10

functions:
  profilePic:
    handler: handler.endpoint
    events:
      - http:
          path: letterAvatar/{initials}
          method: get
          request:
            parameters:
              paths:
                initials: true
Step 4. Deploy
For first time deployments, this may take a minute, because serverless need to configure your AWS account to add the lambda and api gateway services.
$ serverless deploy -v
Successful deploy output
  Sucessful deploy output:

      Service Information
      service: letter-avatar
      stage: dev
      region: us-east-1
      stack: letter-avatar-dev
      api keys:
        None
      endpoints:
        GET - https://{appId}.execute-api.us-east-1.amazonaws.com/dev/letterAvatar/{initials}
      functions:
        profilePic: letter-avatar-dev-profilePic
Step 5. Configure AWS Lambda
Unfortunately, AWS does not support all of the configuration we need to do to get this working via their API yet. So we will need to manually go into our AWS console to continue our configurations.
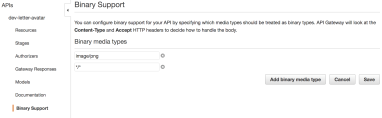
Step 5a. Enable Binary Support for API Gateway
Following this image, we need to add “/” to our binary media type. API Gateway will look at the accept headers of the web request to determine whether or not to use the binary response. If the accept headers don’t exactly match what is listed here, the API will return JSON instead of our lovely png. I opt for */* because our API should always return a PNG, not matter what the accept headers are.
Step 5b. Configure Lambda function permissions
In the API Gateway page click “Resources” -> “GET” -> “Integration request”

Now click on the “pencil” icon next to the lambda function
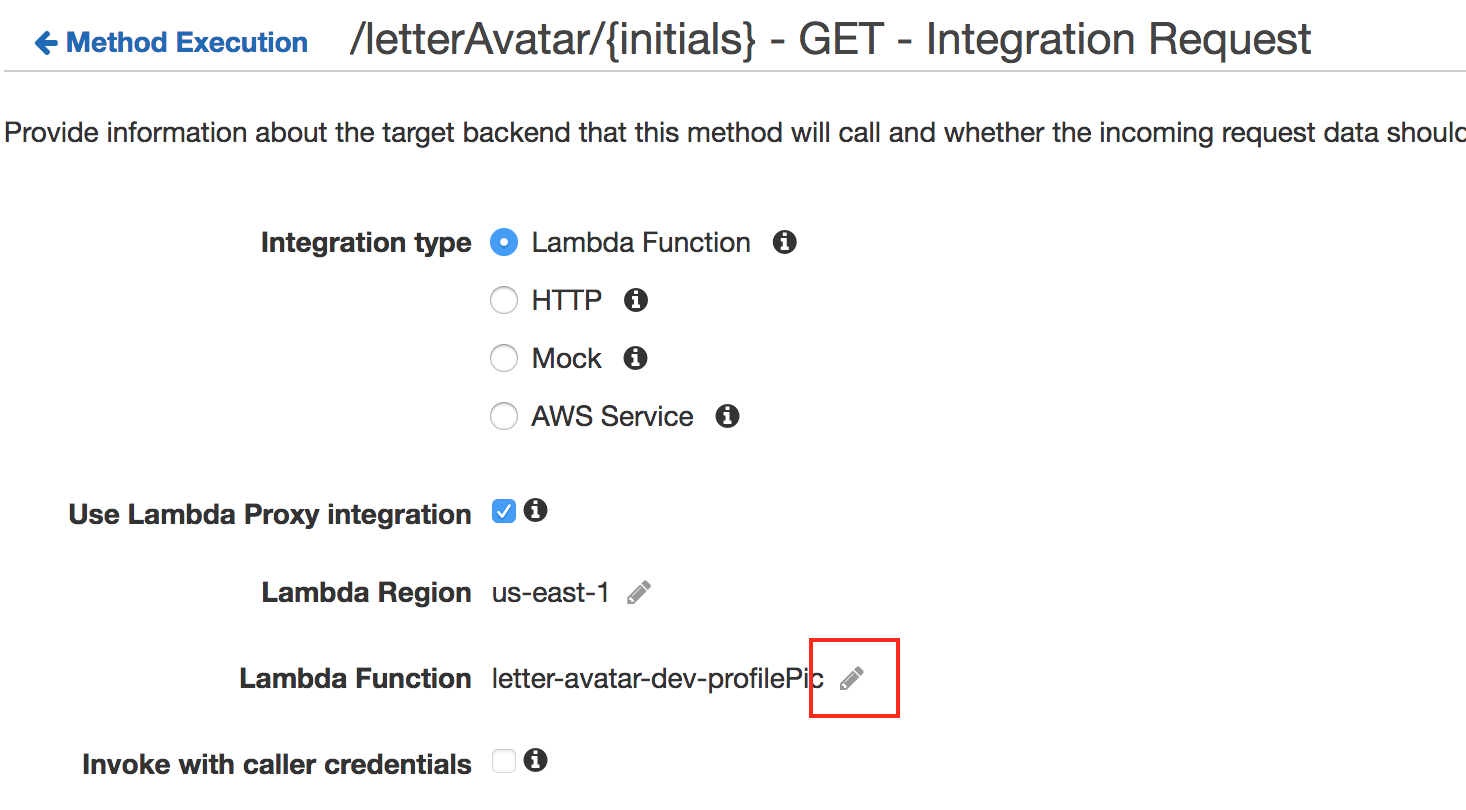
and then click on the check box. This will trigger an alert saying it needs to add a permission to AWS lambda. Click ok, and continue.

Woot! That is it for the configuration.
Step 5c. Re-deploy your app
For these changes to take place, we need to redeploy our lambda app.
$ serverless deploy -v
Step 6. Test your endpoint
In your web browser, hit the given url from the previous step, but replace {initials} with your initials.

Now you can embed these images in images tags or use them on your native mobile app just like you would with a regularly uploaded image.
For the latest source code